Loop the loop – a quick guide to loops in Qlik Sense
Loops in Qlik Sense, also known as script iterations, execute one or more script statements until a limit or condition has been met. Loops can be used either to extract data in iterative steps, or to generate a new table which may require different input for different subsets of the total data set. There are a few types of loops available in Qlik Sense, depending on what your goal is and what your data allows you to do. It’s not always the simplest task to create a loop and make it work as you wish. Here is a quick guide to help you understand when you should use each type of loop.
1. For..Next – the counting loop
The for..next statement is a loop with a counter. The script statements inside the loop, enclosed by ‘for’ and ‘next’, will be executed a specified number of times set in the counter variable. You specify a starting number and an ending number, and the loop will be executed the number of times between these low and high limits.
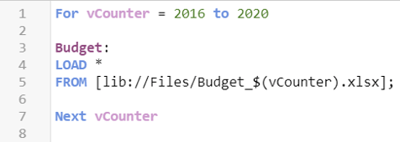
This type of loop assumes that you have a defined start and end number to use as a counter. For example, you want to load data based on a specified interval of years or use the count of rows to limit the number of iterations. A practical example is shown below where a number of budget files are loaded based on the budget year. The year number is used as the counter variable and subsequently in the file name. What happens when this script is executed is that all fields will be loaded from the files named Budget_2016 to Budget_2020. Assuming they have identical field names, the five tables will automatically concatenate, creating a single table called Budget.

2. For Each..next – the list-based loop
The for each..next statement is a loop based on a list of values. The script statements inside the loop, enclosed by ‘for each’ and ‘next’, will be executed for each value in a comma separated list. You specify the list using a list function, and each of the values in the list will be stored in a variable used in each iteration.
This type of loop is useful when you want to use a specific field value in each iteration, whether it’s in a WHERE clause, file name or fieldname. This requires a comma-separated list to be loaded either prior to the loop or to be created in the loop itself. The list can be created either by a list function, such as FieldValueList(), FileList() or DirList(), or it can be specified explicitly in the loop with the values listed and separated by a comma. An example of where the list is explicitly stated in the loop itself is shown below. What happens when this script is executed is that each of the three tables and all of its fields will be loaded separately from the data source defined after the FROM keyword.

3. Do..Loop – the conditional loop
The do..loop statement is a conditional loop. The script statements inside the loop, enclosed by ‘do’ and ‘loop’, will be executed until a logical condition is met. You specify the condition using the conditional clauses ‘while’ or ‘until’.
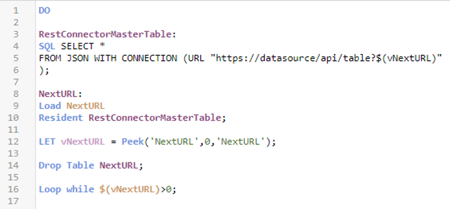
This type of loop is a bit more flexible and is useful when you don’t have a fixed number of iterations or a list of specified values beforehand. A typical example is when you load data from a web-based API that is limited to how many number of rows you can retrieve in each request. You can use this statement to loop through a data source until a certain field value is found, such as a specific date or row number. This requires that you check for the condition in each iteration so the loop knows when to stop. You can look for the condition by putting it in a variable in each loop. An example of this could look like the figure below.

Summary
Using loops is an efficient script method for extracting, generating or storing datasets with just a few lines of code. The end goal of the table and the nature of the dataset determines which loop is suitable in what situation. For more information about data modelling and to get hands-on experience using loops contact the Ometis team today.
Topic: Data analytics


.png)
Comments