Distributing apps from Qlik Sense on Windows to Qlik Cloud
By making a few configurations in the Qlik Management Console, you can automate the distribution of apps from Qlik Sense on Windows to Qlik Sense SaaS when you publish the apps to a stream. The apps are automatically updated in the cloud whenever the apps are reloaded or republished on the server. App distribution is useful when you have a hybrid deployment and need to keep the app development and data on premises, but allow the users to collaborate and consume the apps in the cloud. This blog post will take you through how to distribute apps to your Qlik Sense SaaS tenant in a few simple steps.
Before you start
There are a few requirements needed before you can start setting up the app distribution. Besides having a hybrid deployment, meaning you have Qlik Sense Enterprise on Windows installed on a server as well as a cloud subscription to Qlik Sense Enterprise SaaS, you need to have a license that includes multi-cloud. Once this is enabled in your license key you can follow these six steps.
(1) Set up a multi cloud deployment
The first step is to create a connection between Qlik Sense on Windows and the Qlik Sense SaaS tenant. In the Qlik Management Console (QMC) in Qlik Sense on Windows, go to the section Cloud Distribution and click on Deployment Setup. Set up a new deployment and enter a deployment name, the API endpoint (tenant address) and the audience, qlik.api, as shown in the picture below.
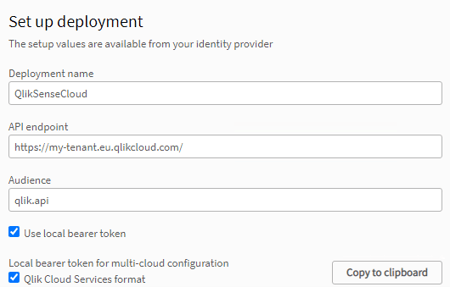
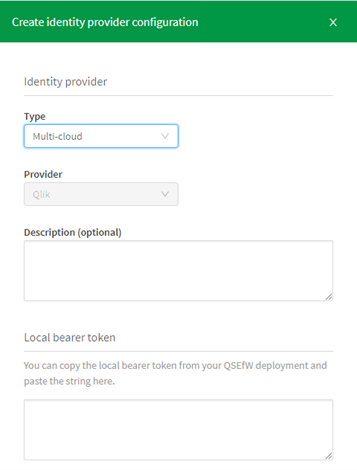
Once you have created and tested the connection, you need to copy the local bearer token. Next, go to your Qlik Sense SaaS tenant and open the Management Console. Go to the section Identity provider and click Create New. Select Multi-cloud as the type and paste the local bearer token string as instructed.
(2) Create a custom property
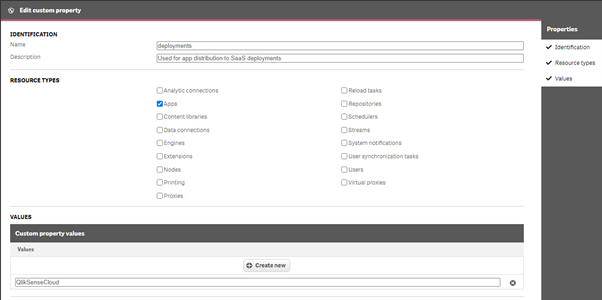
A custom property can be used for multiple purposes, typically you apply it to security rules for any type of resource. In this case, the custom property is used to mark the app for distribution purposes and will act as a link between the app and the distribution policy (which we will set up in the next step). Go to the QMC of Qlik Sense on Windows and to the section Custom Properties. Create a new custom property and give it a name. Please note that the custom property name needs to be in lower-case letters. Select Apps as the resource type and use the multi-cloud deployment name (created in the previous step) as the custom property value.
(3) Create a distribution policy
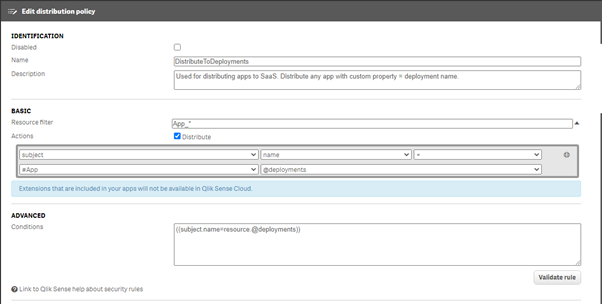
Distribution policies are used to determine whether a published app can be distributed to one or more deployments in Qlik Sense SaaS. In the QMC of Qlik Sense on Windows, open Cloud Distribution and select Distribution Policies. Create a new distribution policy, select Create rule from template list and use the Distribution_App template. This will populate the fields for you. Verify that the resource filter value is App_* and the action Distribute is selected. In the rule editor, select #App as value and add the name of the custom property in the last field. The Conditions box in the Advanced section should have the following string: ((subject.name=resource.@deployments)). Validate the rule and click Apply to save it.
(4) Add a custom property to the app
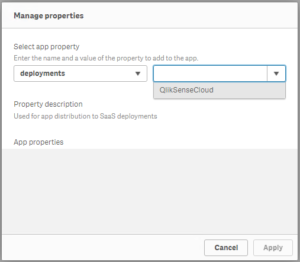
Now we are all set to start distributing apps to the cloud. Before you publish the app you would like to distribute, you need to tag it with the previously created custom property. Go to the hub and right-click on the app, then go to Manage Properties. Select the custom property from the left drop-down list and then select the cloud deployment name in the right drop-down list.
(5) Publish the app to the stream
The app needs to be published to a stream in Qlik Sense on Windows in order to be distributed to the cloud. Once you have published the app, tagged with the custom property, you can view the distribution status in the QMC. Go to the section Cloud Distribution and click on Distribution Status. Here you can view the details of all the apps that you have distributed.

(6) Allocate the app to a space
If the app distribution was successful, the app will show up in the Staged Apps area in the SaaS tenant. Go to the SaaS tenant and the Management Console. In the section Apps, click on the tab called Staged and select the app you would like publish. Click on Set Space and select the space it will be published to. That’s it, all done.

What happens next?
Once the app has been distributed and allocated to a space in Qlik Sense SaaS, the app will automatically refresh whenever the app reloads on premises. The app will also automatically update if changes have been made to the original app and those changes were republished on premises. If you have any questions about hybrid deployments or data distribution to your Qlik Sense SaaS tenant, don’t hesitate to contact the Ometis team.
Topic: Data analytics


Comments